example package
Submodules
example.CTKtest module
CustomTkinterの使用例.
- Summary:
このエグザンプルコードはCustomTkinterを使用してGUIアプリケーションを構築する際の例になります。 CustomTkinterで紹介されているコードをそのまま掲載しています。 TkinterよりリッチなGUIを使用したい場合に検討してください。 このコードを実行するには開発用パッケージを追加インストールする必要があります。 具体的にはrequirements_dev.txtをインストールしてください。
pip install -r requirements_dev.txt
サンプル
python3 example/CTKtest.py
- Result:

- Source code:
example.Faiss_Outlier_Detection module
FAISSによる外れ値検出スクリプト.
- Summary:
このスクリプトは、指定したディレクトリ内の512次元ベクトルデータ(npKnown.npz形式)を読み込み、FAISSライブラリを使用して外れ値検出を行います。 コサイン類似度を基準に、類似度が低いデータを外れ値として分類し、指定のディレクトリに移動します。 顔認証データセットの一貫性を検証するためのツールとして利用できます。
このスクリプトは、FAISSによるベクトルのインデックス化と検索、データの正規化、外れ値の検出とファイルの移動を行います。
このコードは`Zenn`の記事のコード例です。
コサイン類似度データの中の外れ値をもつファイルを見つける方法
詳しくは上記記事をご参照ください。
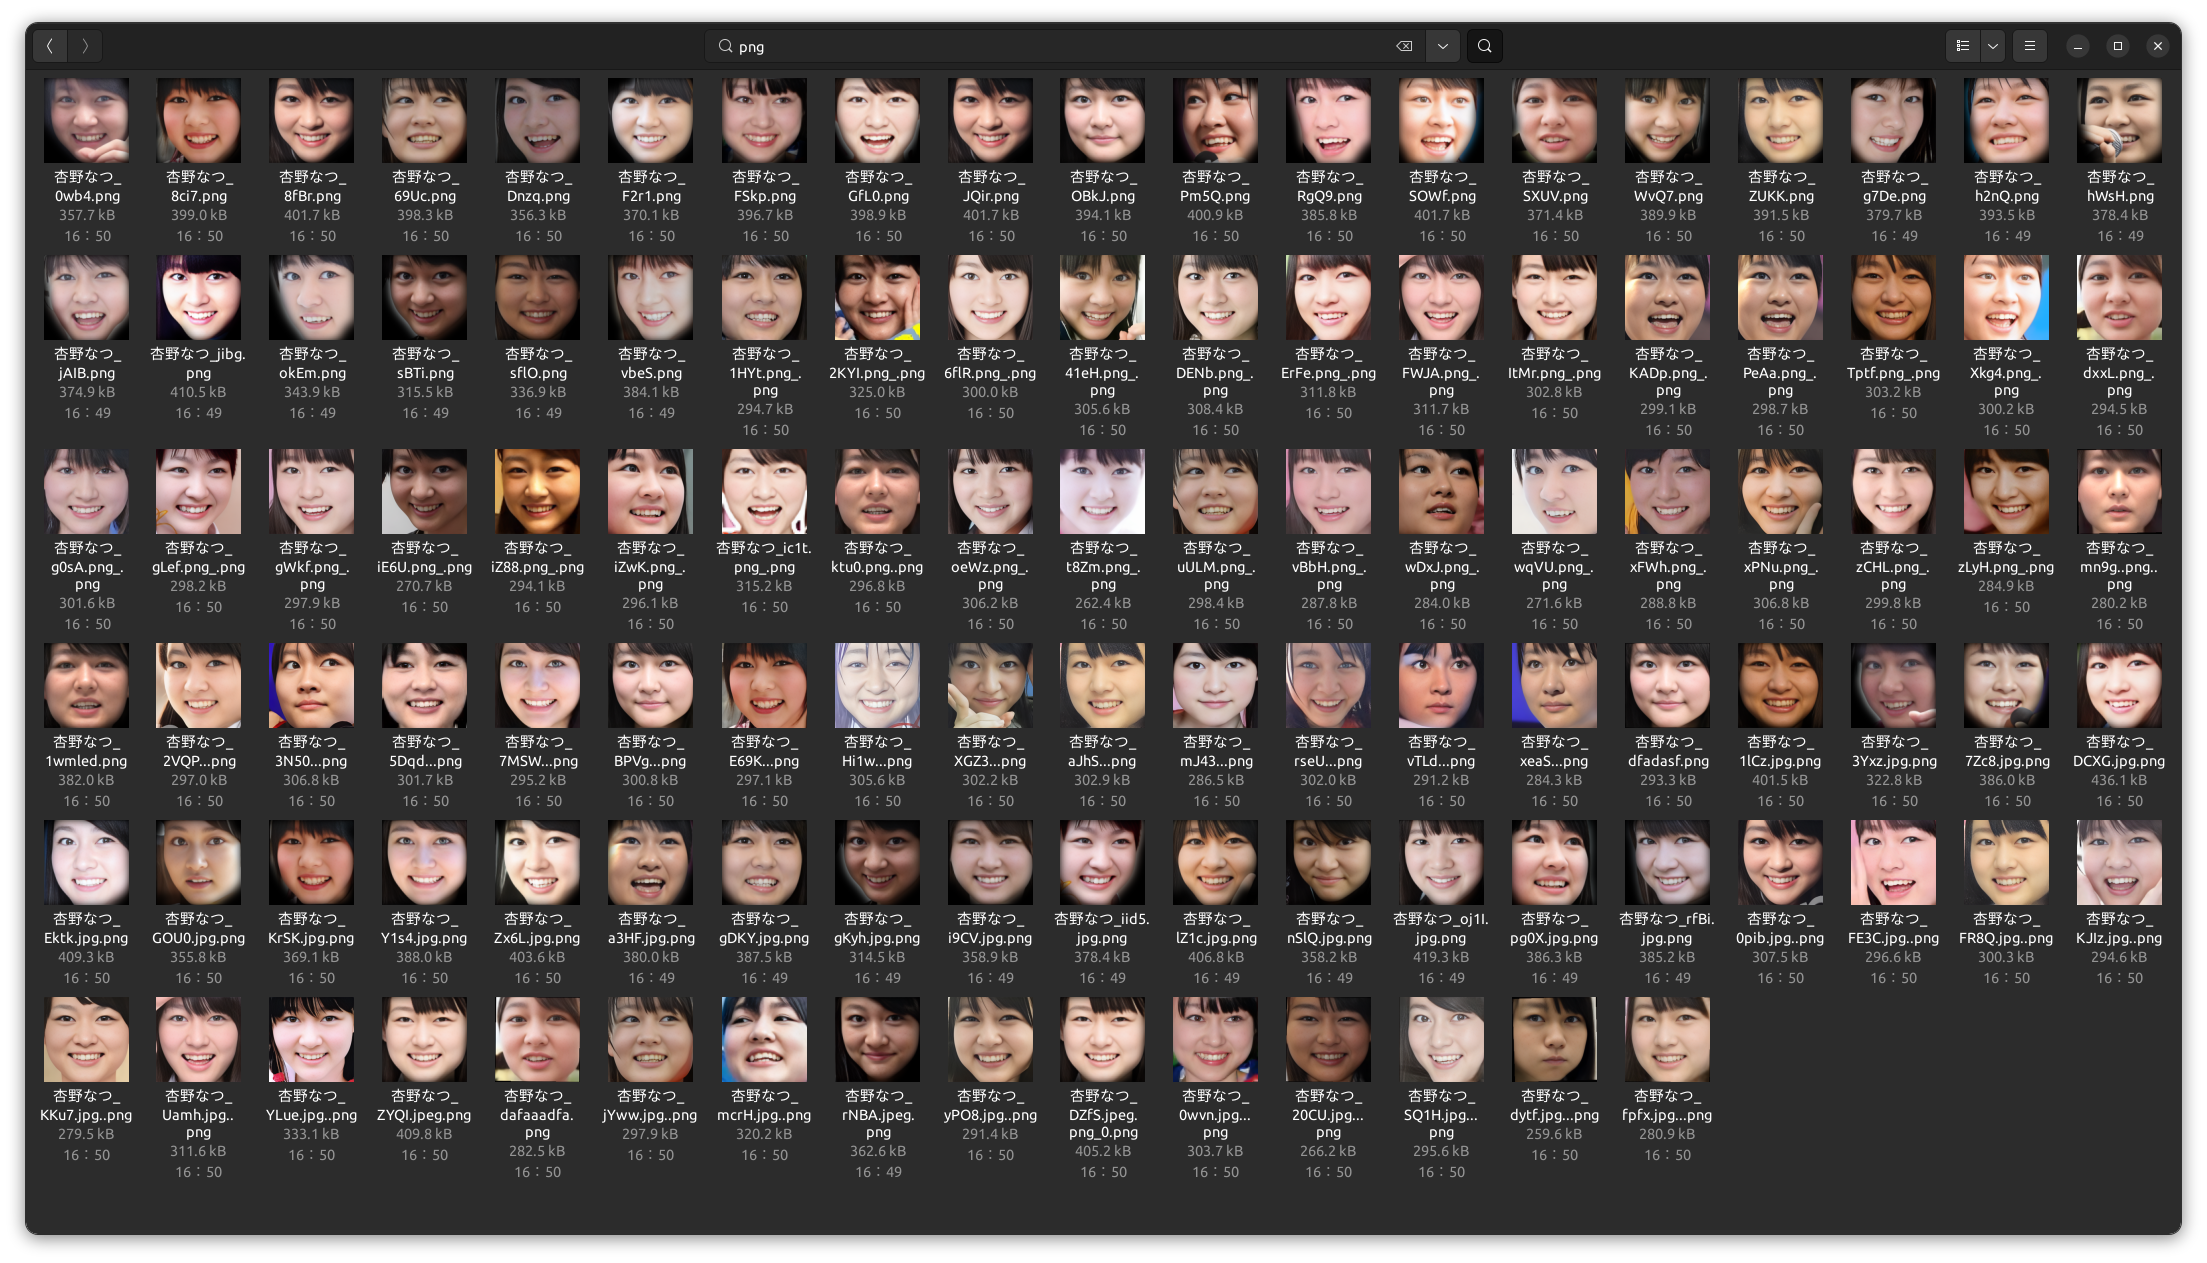
すべての顔画像ファイル
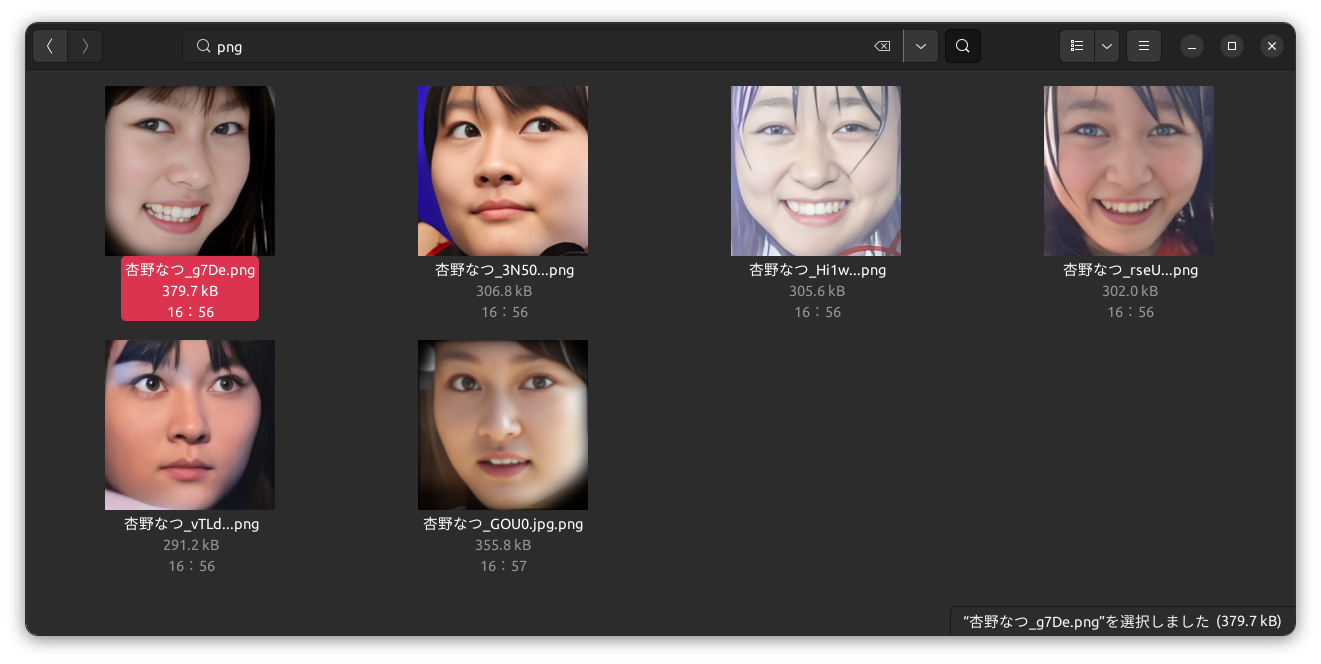
外れ値の顔画像ファイル
サンプル
python3 example/Faiss_Outlier_Detection.py /path/to/dataset
- Source code:
example.LOF_Outlier_Detection module
LOFによる外れ値検出スクリプト.
- Summary:
このスクリプトは、指定したディレクトリ内の512次元ベクトルデータ(npKnown.npz形式)を読み込み、Local Outlier Factor(LOF)アルゴリズムを使用して外れ値検出を行います。 コサイン類似度を基準にして各データの異常スコアを計算し、スコアが閾値を超えるデータを外れ値として判定し、指定のディレクトリに移動します。 顔認証データセットの一貫性を保つためのツールとして利用できます。
このスクリプトは、データの正規化、LOFによるスコア計算、外れ値の判定とファイルの移動を行います。
このコードは`Zenn`の記事のコード例です。
コサイン類似度データの中の外れ値をもつファイルを見つける方法
詳しくは上記記事をご参照ください。
すべての顔画像ファイル
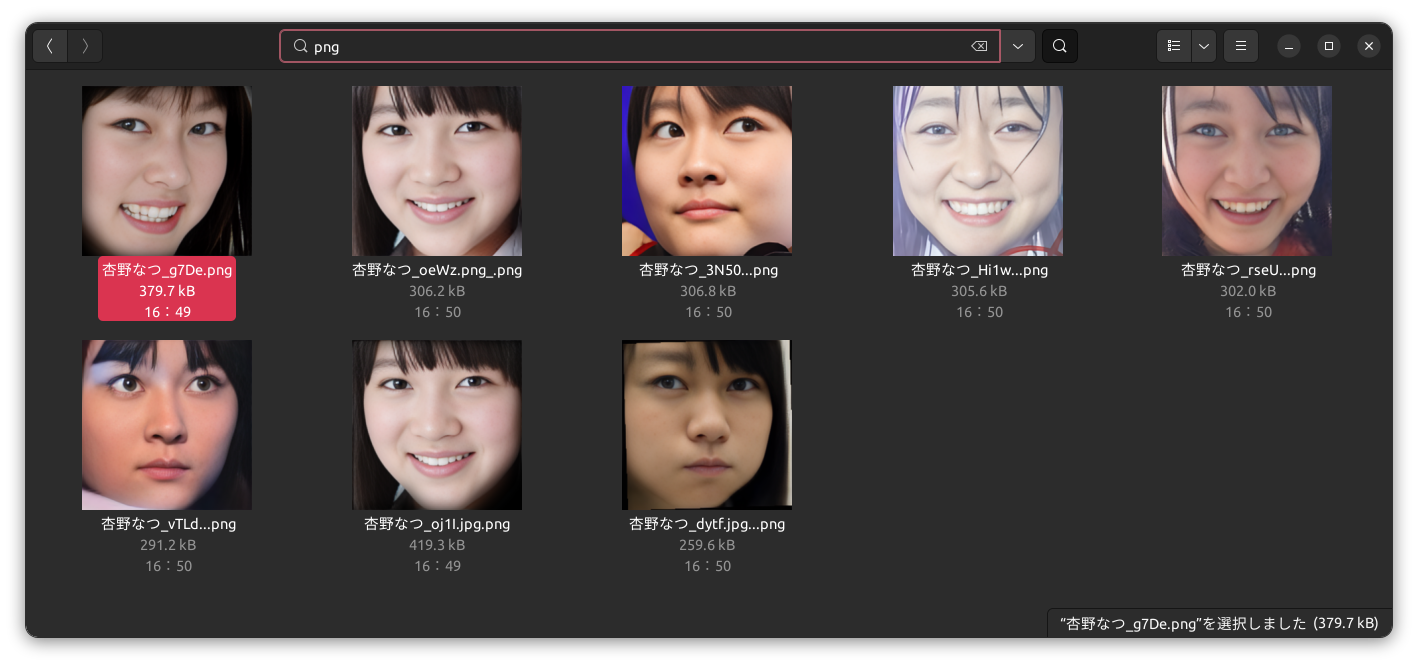
外れ値の顔画像ファイル
サンプル
python3 example/LOF_Outlier_Detection.py /path/to/dataset
- Source code:
example.aligned_crop_face module
顔画像を検出、回転、クロップするコード例.
- Summary:
このエグザンプルコードでは、整列された(aligned)顔画像を取得する例を示します。
- param path:
顔画像が存在するディレクトリパス
- type path:
str
- param size:
抽出する顔画像のピクセル数を整数で指定します。デフォルトは400です。
- type size:
int, optional
サンプル
python3 example/aligned_crop_face.py <path> <size>
- Result:

# Initialize
CONFIG: Dict = Initialize('DEFAULT', 'info').initialize()
# Set up logger
logger = Logger(CONFIG['log_level']).logger(__file__, CONFIG['RootDir'])

初期化とloggerのセットアップ. FACE01を使用してコーディングするときは、'initialize'と'logger'を最初にコードします。 これにより、設定ファイルであるconfig.iniファイルを読み込み、ログレベルなどを決定します⭐️''
- Image:
- Source code:
example.anti_spoof module
アンチスプーフ機能を試すエグザンプルコード.
- Summary:
極めて簡単にマルチモーダルのためのQRコードを作成します。 洗練されたQRコード作成を作成したい場合は 'example/make_ID_card.py'を参照してください。
サンプル
python3 example/anti_spoof.py
- Results:
スクリーンショットは作成されるQRコードを示しています。

example.average_face module
平均顔を作成するコード例.
- Summary:
このエグザンプルコードでは、average_face.txtにリストされたファイル名を持つ顔画像を読み込み、 それらの画像から平均顔を作成する手順を学びます。

サンプル
python3 example/average_face.py
- Source code:
example.benchmark_CUI module
顔認識のベンチマークをとるエグザンプルコード例.
- Summary:
このコード例では、CUIモードでのベンチマークテストを行う方法を示します。 このベンチマークテストを行うには開発用パッケージを追加インストールする必要があります。 具体的にはrequirements_dev.txtをインストールしてください。
pip install -r requirements_dev.txt
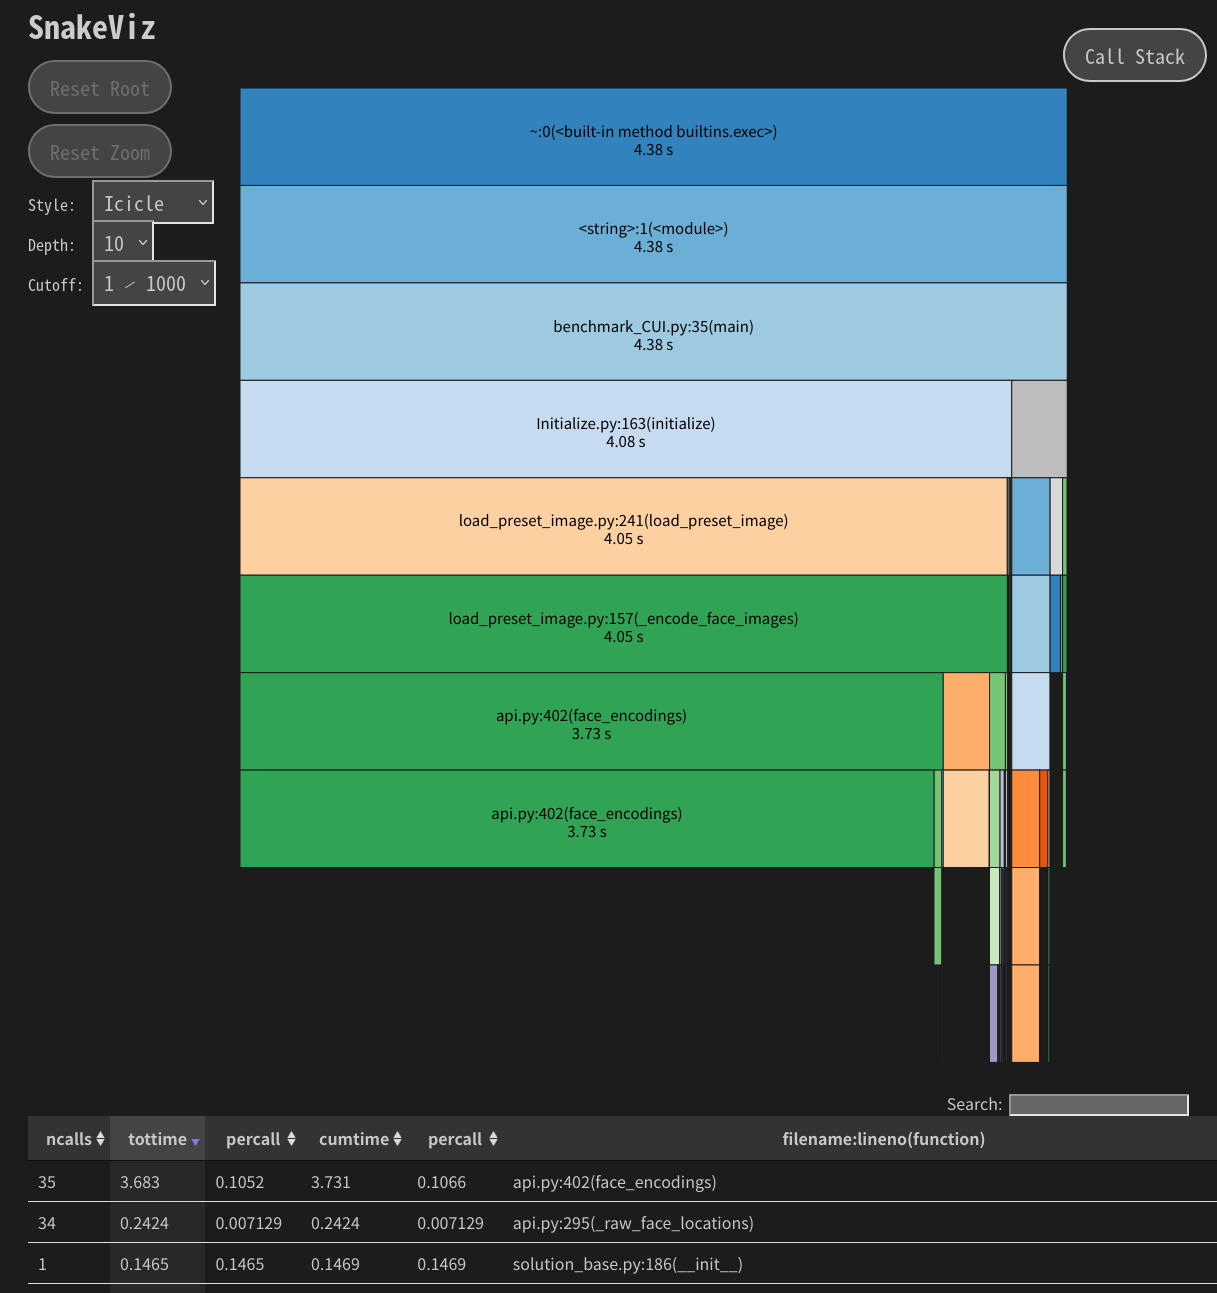
実行後、ベンチマークが自動的にブラウザで表示されます。 終了するには、このエグザンプルが実行されているターミナル(またはコンソール)で「Ctrl + C」を押してください。
サンプル
python3 benchmark_CUI.py
- Source code:
example.benchmark_GUI_window module
顔認証におけるベンチマークコード例.
- Summary:
このエグザンプルコードでは、GUIウィンドウを作成したときの顔認証ベンチマークを取得する方法を学びます。 このベンチマークテストを行うには開発用パッケージを追加インストールする必要があります。 具体的にはrequirements_dev.txtをインストールしてください。
pip install -r requirements_dev.txt
起動後、自動的にベンチマーク結果がブラウザ表示されます。 終了するには、このエグザンプルが実行されているターミナル(またはコンソール)で「Ctrl + C」を押してください。
サンプル
python3 example/benchmark_GUI_window.py
- Result:

- Source code:
- logger = <Logger /home/terms/bin/FACE01_DEV/example/benchmark_GUI_window.py (INFO)>
Initialize and Setup logger. When coding a program that uses FACE01, code initialize and logger first. This will read the configuration file config.ini and log errors etc.
example.combination_counter module
組み合わせ計算の例.
- Summary:
Zennの記事のコード例です。 顔データセットの組み合わせ総数を計算します。
【faiss】なにこれすごい。顔データセットの間違い探し 成功編③
npKnown.npzファイルが見つからない場合、npKnown.npzファイルを作成します。 詳しくは上記記事をご参照ください。
サンプル
python3 combination_counter.py
- Source code:
example.combination_similarity module
顔画像ファイルの全組み合わせを計算する例.
- Summary:
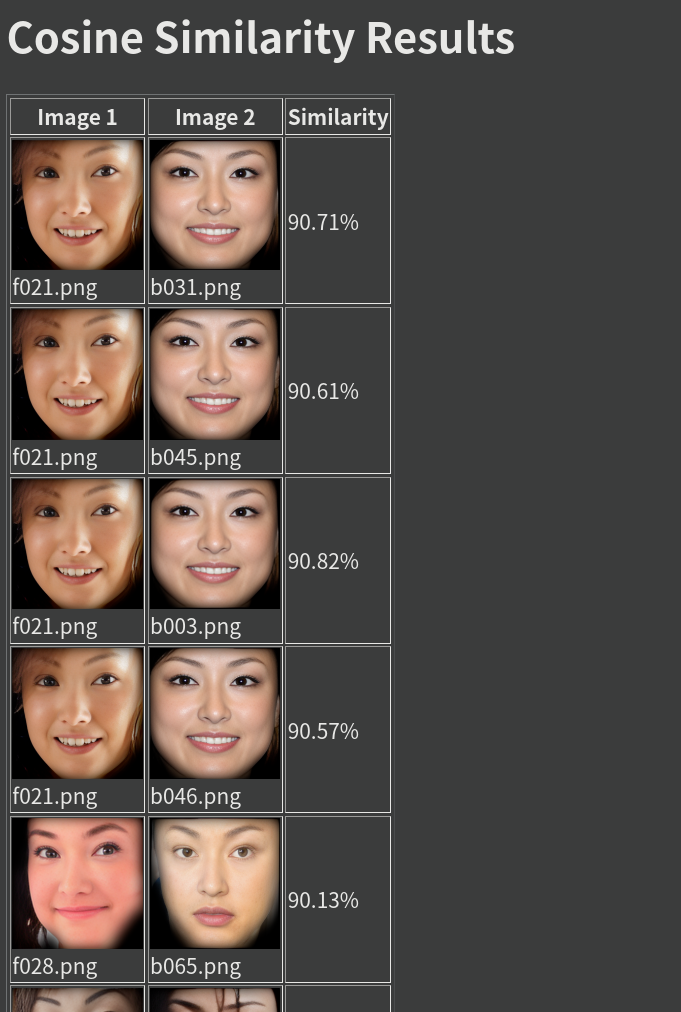
このシンプルなコード例では、日本人専用として学習された顔学習モデルであるJAPANESE FACE V1を用いて、顔画像同士の全ての組み合わせを計算し、 類似度が高い組み合わせをhtmlファイルとしてプロジェクトルートディレクトリに'output.html'として保存します。
顔画像ファイルが異なるディレクトリに配置され、また各ディレクトリにはすでに`npKnown.npz`ファイルが作成済みなものと想定しています。
このコードは`Zenn`の記事のコード例です。
【faiss】なにこれすごい。顔データセットの間違い探し 成功編③
詳しくは上記記事をご参照ください。 このコード例では組み合わせパターンが爆発的に大きくなると処理時間もそれに応じて爆発的に大きくなるコード例を示しています。
サンプル
python3 example/combination_similarity.py
データセットの外れ値などを探す場合に有用なコード例です⭐️''
しかしデータセットが大きくなると、リンク先のように'faiss'を使う必要が出てきます。
- Source code:
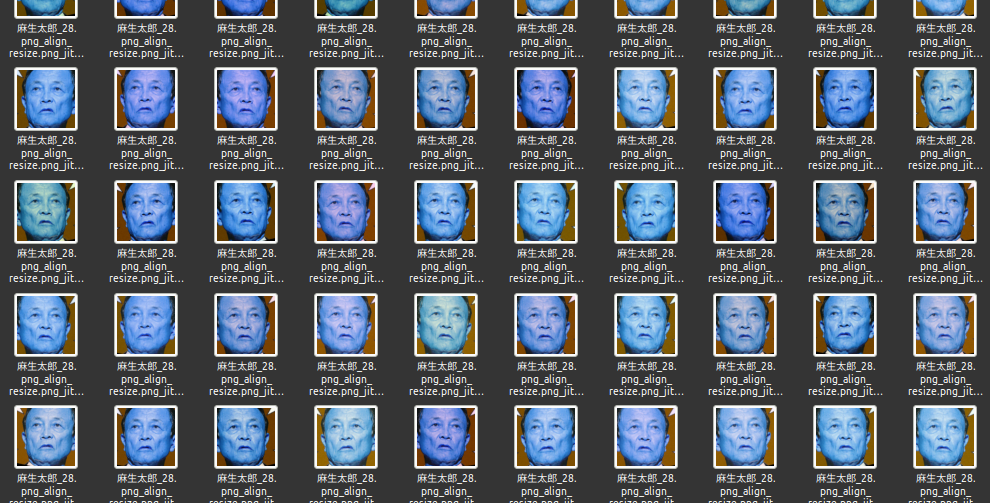
example.data_augmentation module
データセットのデータ拡張コード例.
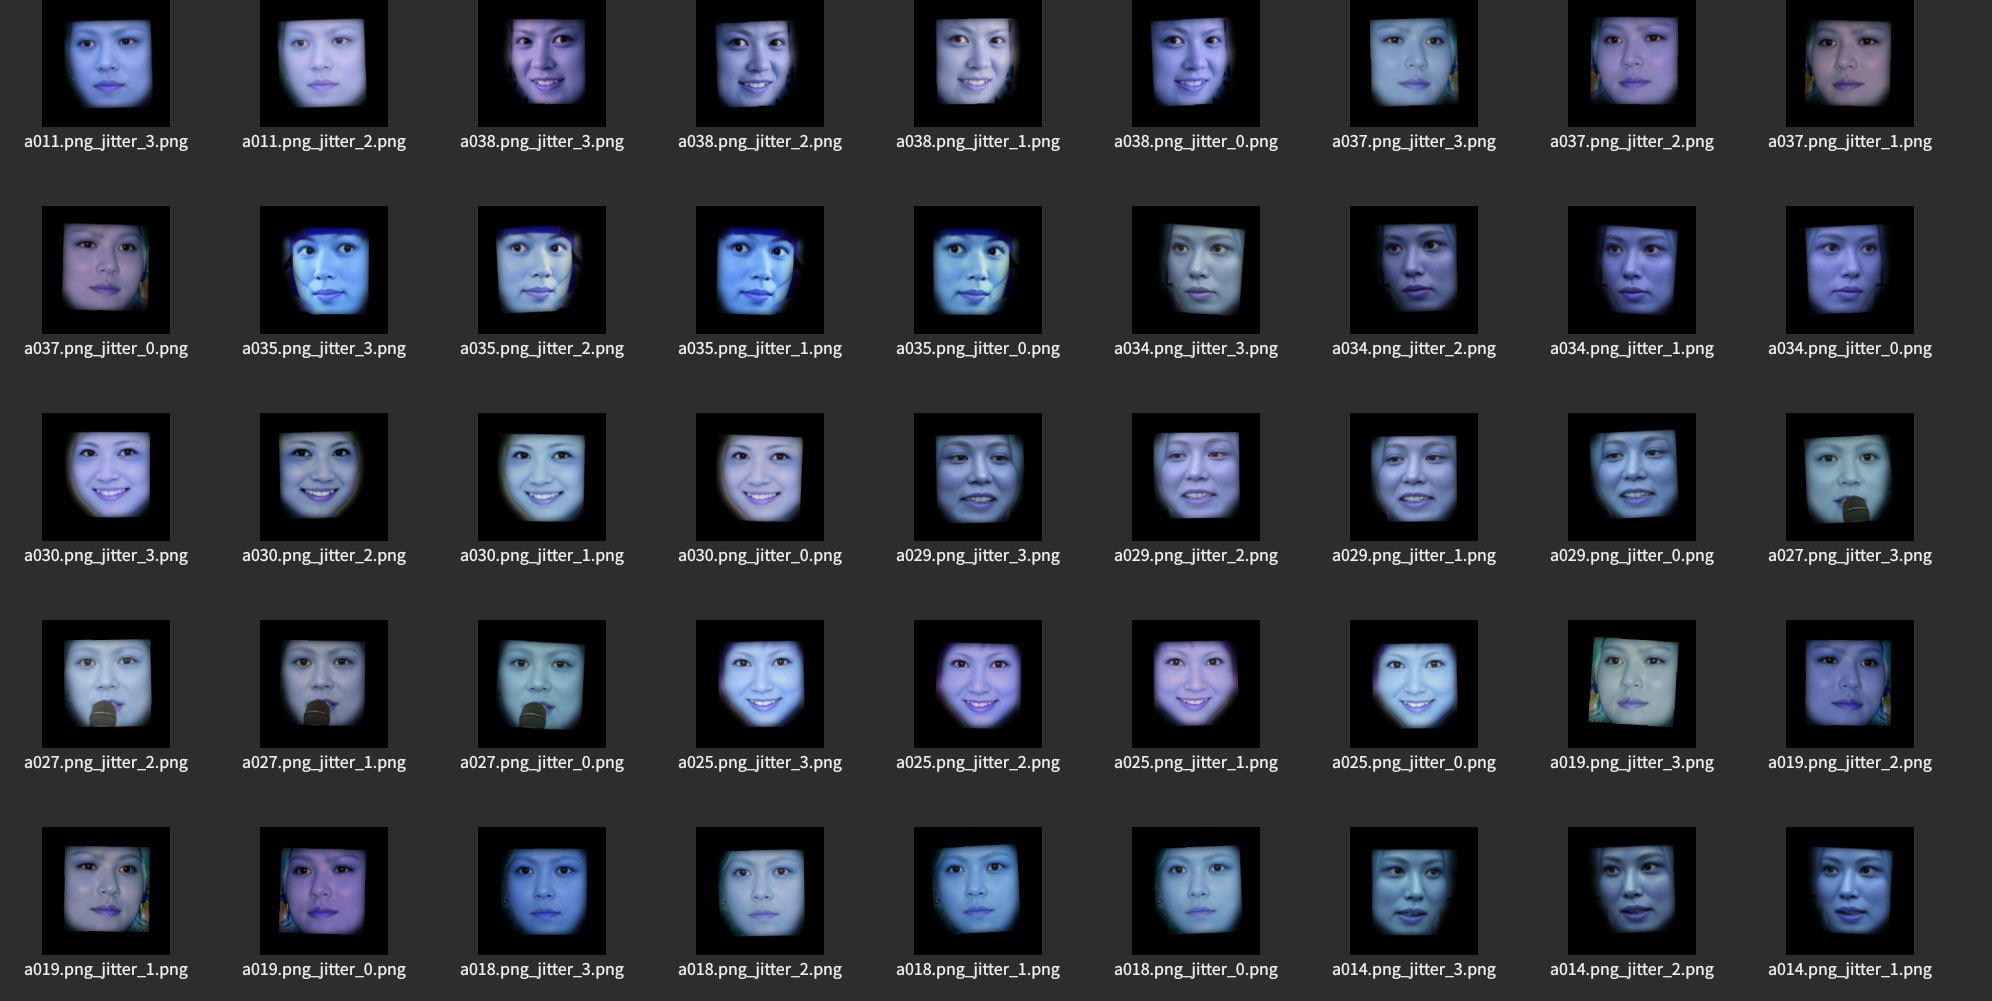
- Summary:
このエグザンプルコードでは、データセットのデータ拡張する方法に ついて学びます。
サンプル
python3 example/data_augmentation.py "/path/to/dir" "" "lens" 224 10 -0.1 0.1 0.01
- Result:
- Source code:
- logger = <Logger /home/terms/bin/FACE01_DEV/example/data_augmentation.py (INFO)>
Initialize and Setup logger.
- main(dir_path: str, size: int = 224, num_jitters: int = 10, initial_value: float = -0.1, closing_value: float = 0.1, step_value: float = 0.01)[ソース]
この簡単なコード例では、与えられたディレクトリパスから再帰的に ファイルを読み込み、それらに対してデータ拡張を行います。 この例でのデータ拡張は、FACE01のUtilsモジュールから、 樽型歪みとジッターを呼び出します。
- パラメータ:
dir_path (str) -- ターゲットディレクトリの絶対パス.
size (int, optional) -- 作成するイメージサイズ. Defaults to 224.
num_jitters (int, optional) -- ジッター回数. Defaults to 10.
initial_value (float, optional) -- 樽型歪みの初期値. Defaults to -0.1.
closing_value (float, optional) -- 終わり値. Defaults to 0.1.
step_value (float, optional) -- ステップ値. Defaults to 0.01.
- 戻り値:
ターゲットディレクトリから再帰的に読み込んだディレクトリごとに データ拡張したファイルを保存します。

樽型歪みをデータセットに加えることで、カメラのキャリブレーションが出来ない環境への耐性を高めます⭐️'' レンズの歪曲収差と対応方法 をご参照ください。
example.data_augmentation_mp module
データ拡張をマルチプロセスで行うコード例.
- Summary:
このエグザンプルコードでは、時間のかかるデータ拡張においてマルチプロセス処理を行います。
サンプル
python3 example/data_augmentation.py "/path/to/dir" "" "lens" 224 10 -0.1 0.1 0.01 4
- Source code:
- logger = <Logger /home/terms/bin/FACE01_DEV/example/data_augmentation_mp.py (INFO)>
Initialize and Setup logger.
- main(dir_path: str, size: int = 224, num_jitters: int = 10, initial_value: float = -0.1, closing_value: float = 0.1, step_value: float = 0.01, max_workers: int | None = None)[ソース]
main メインメソッド
- パラメータ:
dir_path (str) -- ディレクトリパス
size (int, optional) -- 画像サイズ. Defaults to 224.
num_jitters (int, optional) -- ジッター処理回数. Defaults to 10.
initial_value (float, optional) -- 初期値. Defaults to -0.1.
closing_value (float, optional) -- 最終値. Defaults to 0.1.
step_value (float, optional) -- ステップ値. Defaults to 0.01.
max_workers (Optional[int], optional) -- 並行処理値. Defaults to None.
example.data_structure module
- Summary:
FACE01を使う上で知っておくべきデータ構造について学びます。
サンプル
python3 example data_structure.py
- Config.ini setting:
FACE01においてデータ構造は'config.ini'の設定に深く関係しています。 以下に記述された'config.ini'では、GUIウィンドウは描画しないface-detectionとface-recognition用です。
[DEFAULT]
# [DEFAULT] section is for simple example.
# This [DEFAULT] setting for only use CUI mode.
# Also, This setting is for user who's PC is not installed Nvidia GPU card.
# [DEFAULT] section is the inheritor of all sections.
headless = True
anti_spoof = False
output_debug_log = False
log_level = info
set_width = 750
similar_percentage = 99.1
jitters = 0
preset_face_images_jitters = 10
upsampling = 0
mode = hog
frame_skip = 5
number_of_people = 10
use_pipe = True
model_selection = 0
min_detection_confidence = 0.6
person_frame_face_encoding = False
same_time_recognize = 2
set_area = NONE
movie = assets/test.mp4
user =
passwd =
rectangle = False
target_rectangle = False
draw_telop_and_logo = False
default_face_image_draw = False
show_overlay = False
alpha = 0.3
show_percentage = False
show_name = False
crop_face_image = True
frequency_crop_image = 5
crop_with_multithreading = False
Python_version = 3.8.10
cpu_freq = 2.5
cpu_count = 4
memory = 4
gpu_check = True
calculate_time = False
show_video = False
number_of_crops = 0
1行目の'headless'が'True'なら、CUIで動作します⭐️''
- Result:
以下に示す出力が得られます。 (The output string has been formatted to make it easier to read.)
frame_datas:
{
    'img': array([[[0, 0, 0], [0, 0, 0], ..., [0, 0, 0], dtype=uint8),
    'face_location_list': [(165, 449, 287, 327), (240, 435, 391, 284)],
    'overlay': array([[[  0,   0,  70],  ..., [ 88, 169, 127]], dtype=uint8),
    'person_data_list':
    [
        {
            'name': '安倍晋三',
            'pict': 'output/安倍晋三_2022,10,08,19,17,41,346789_0.2.png',
            'date': '2022,10,08,19,17,41,344598',
            'location': (165, 449, 287, 327),
            'percentage_and_symbol': '99.7%'
        },
        {
            'name': 'Unknown',
            'pict': 'output/安倍晋三_2022,10,08,19,17,41,346789_0.2.png',
            'date': '2022,10,08,19,17,41,344598',
            'location': (240, 435, 391, 284),
            'percentage_and_symbol': ''
        }
    ]
}
- データ構造:
'frame_datas_array'は以下に記述するような様々な情報を持つ辞書に似た変数です。
Dictionary
img: NDArray of a frame
face_location_list: List of face-coordinates
overlay: Shallow copy of img
person_data_list: List of person-coordinate which is included in 'face_location_list'
In addition, the 'person_data_list' variable is an array that contains the variables described below.
List
Dictionary
name: name
pict: Saved image's file name which is cropped by face-coordinate in a frame
date:
location: Face-coordinate
percentage_and_symbol: xx%
- Source code:
example.detect_eye_blink module
まばたきを検出するコード例.
- Summary:
このエグザンプルでは、目の瞬き検出を扱うコード例を示します。
サンプル
python3 example/detect_eye_blink.py
注釈
このコードを実行する際、入力されるソースには必ず1人だけのものを選ばなくてはいけません。 複数人を対象とすることはできません。
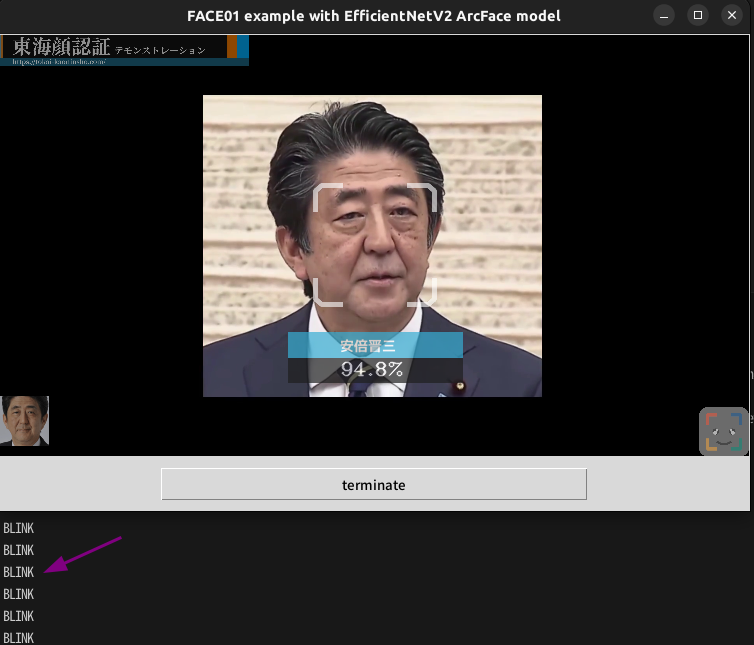
注目すべきは瞬きの検出が1行で済んでいるところです!⭐️''
blink_detected: bool = self.spoof.detect_eye_blinks(self.current_frame_datas_array, CONFIG)
- Source code:
example.display_GUI_window module
GUI表示と顔認識データ出力の例。
- Summary:
In this example you can learn how to display GUI and output face recognition.
サンプル
python3 example/display_GUI_window.py
Results:
'Core().common_process(self.CONFIG)'で得られたジェネレーターを'for'で回すだけで全ての情報が取得できるんです!⭐️''
- Source code:
参考
ttkbootstrap https://ttkbootstrap.readthedocs.io/en/version-0.5/themes.html
example.display_GUI_window_JAPANESE_FACE_V1 module
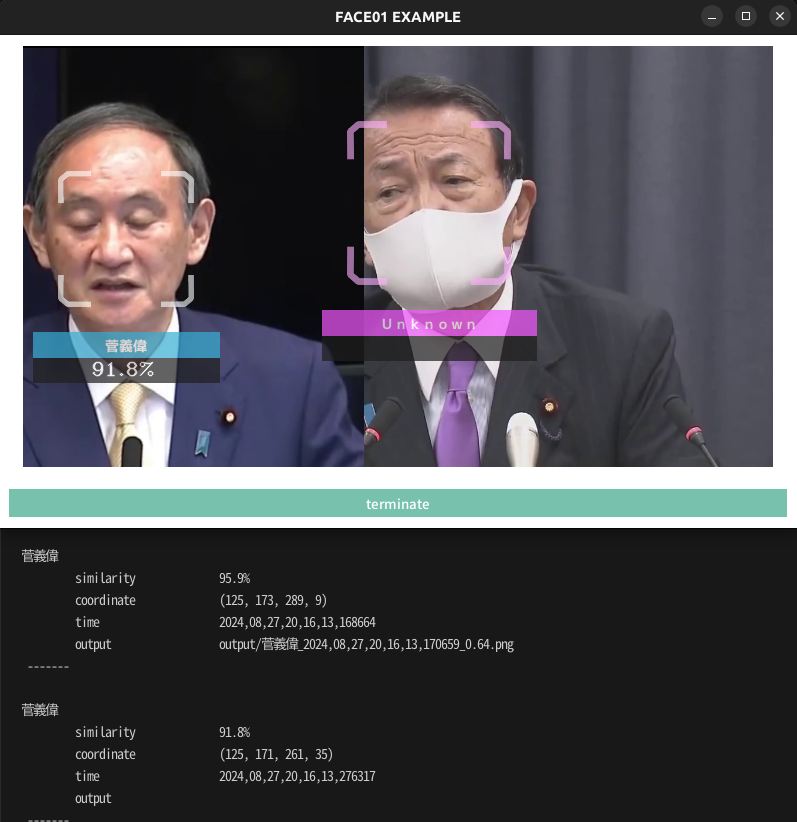
顔画像を検出し、回転・クロップ・表示するウィンドウアプリケーション.
- Summary:
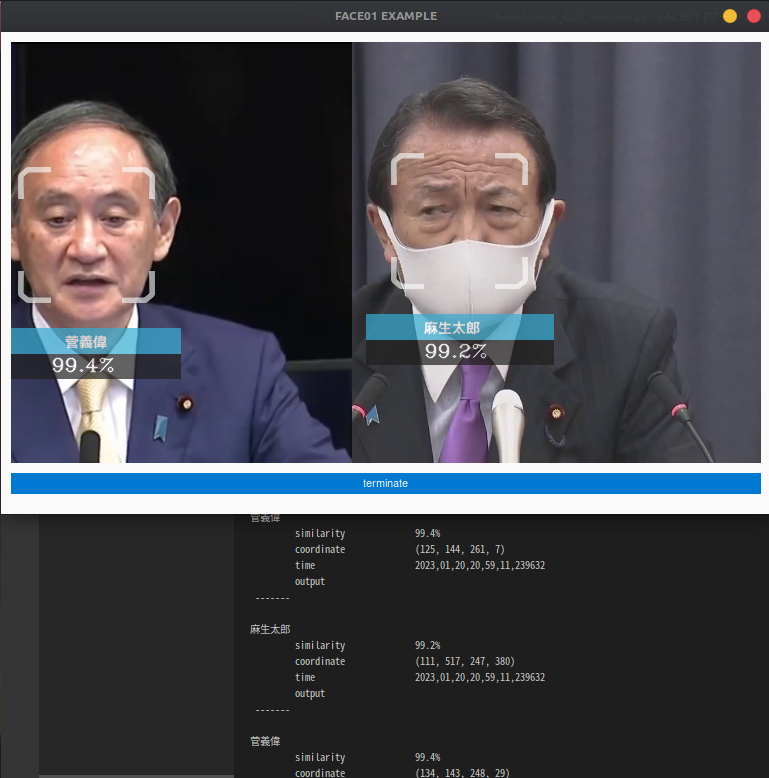
このプログラムは、顔認識モデルを使用して動画フレーム内の顔を検出し、 データを解析、ウィンドウにリアルタイムで表示します。 また、指定された回数分フレームを処理します。
サンプル
python3 example/display_GUI_window_JAPANESE_FACE_V1.py <exec_times>
- Features:
顔認識モデルを使用して顔をリアルタイムで検出
検出結果をターミナルに表示 (類似度、座標、時刻など)
検出されたフレームをGUIウィンドウで表示
処理回数または検出件数に応じて終了
サンプル
python3 example/display_GUI_window_JAPANESE_FACE_V1.py
- Result:
GUIウィンドウにリアルタイムで処理結果を表示
ターミナルに検出データを詳細表示
example.display_GUI_window_JAPANESE_FACE_V1_with_YOLO module
example.distort_barrel module
- Summary:
樽型歪み画像をシミュレートするコード例です。
- param path:
顔画像ファイルが含まれる対象ディレクトリへのパス。
- param size:
解像度の指定。Default is 224px.
サンプル
python3 example/distort_barrel.py path size
# 初期化
CONFIG: Dict = Initialize('JAPANESE_FACE_V1_MODEL_GUI', 'info').initialize()
# ロガーの設定
logger = Logger(CONFIG['log_level']).logger(__file__, CONFIG['RootDir'])
この2行はお約束ですね⭐️''
1行目は設定ファイルを読み込み、2行目でロガーを指定しています💗
- Source code:
- main(dir_path: str, align_and_resize_bool: bool = False, size: int = 224, padding: float = 0.1, initial_value: float = -0.1, closing_value: float = 0.1, step_value: float = 0.1) None[ソース]
このシンプルなコード例では、拡張子がpng, jpg, jpeg画像を含むディレクトリのパスを受け取り、樽型歪み処理をして、それらを保存します。
See also: Tokai-kaoninsho:レンズの歪曲収差と対応方法(6)
- パラメータ:
path (str) -- 絶対パス: 例えば"~/bin/FACE01_DEV/assets/data"
align_and_resize_bool (bool, optional) -- Whether to align and resize. Defaults to False.
size (int, optional) -- Width and height. Defaults to 224.
initial_value (float) -- Initial value. Default is -0.05.
closing_value (float) -- Closing value. Default is 0.05.
step_value (float) -- Step value. Default is 0.05.
- 戻り値:
None
- Result:
- Image:
example.draw_datas module
Example of to draw datas using matplotlib.
- Summary:
このエグザンプルコードコードでは、顔のエンコードデータからをMatplotlibを使用して可視化します。
サンプル
python3 example/draw_datas.py
- Result:

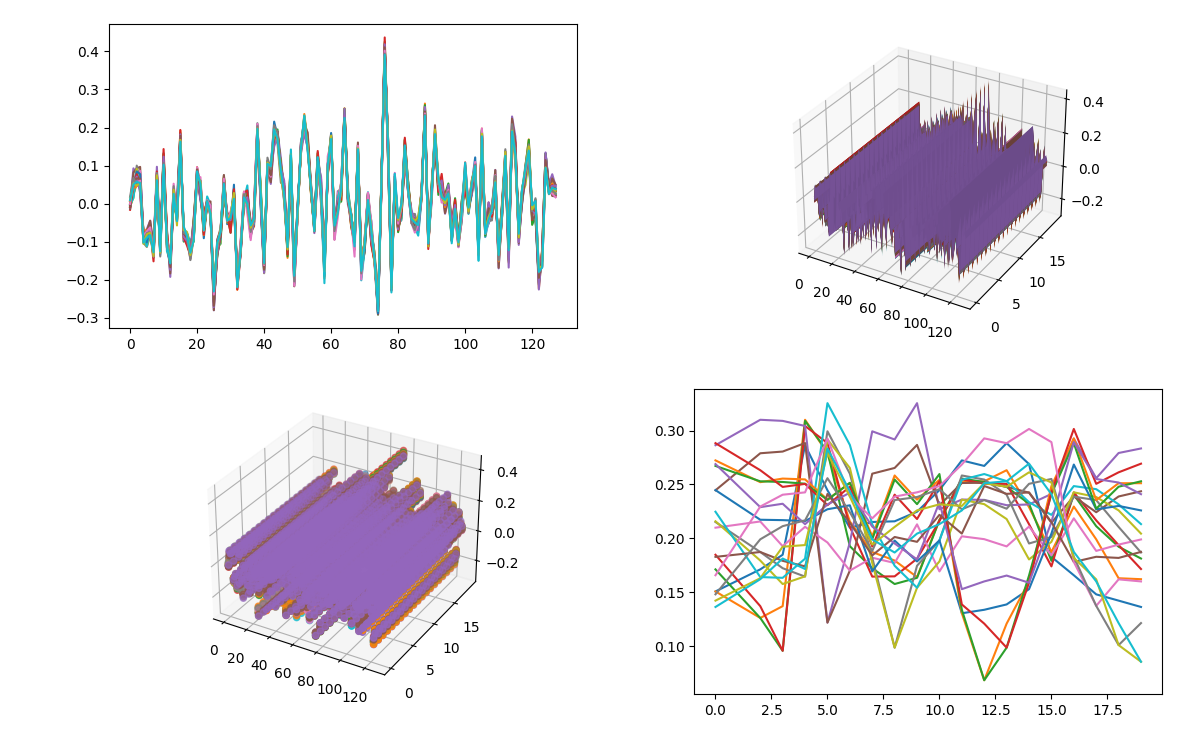
注釈
この例では学習モデルをdlibに指定、つまりconfig.iniでdeep_learning_modelを0にしてください。
- Source code:
example.example_logging module
- Summary:
このエグザンプルコードではログ機能について学びます。
- You can choose from two types of log_level:
info
debug
in CONFIG: Dict = Initialize('DEFAULT', 'log_level').initialize().
サンプル
# Initialize
CONFIG: Dict = Initialize('DEFAULT', 'debug').initialize()
# Set up logger
logger = Logger(CONFIG['log_level']).logger(__file__, CONFIG['RootDir'])
python3 example/logging.py
- Source code:
- main(exec_times: int = 50) None[ソース]
Setup logger example.
Output log with defined log-level.
- パラメータ:
exec_times (int, optional) -- Number of frames for process. Defaults to 50 times.
Output example:
[2024-08-27 21:18:34,678] [/home/terms/bin/FACE01_DEV/example/example_logging.py] [example_logging.py] [DEBUG] 安倍晋三
[2024-08-27 21:18:34,678] [/home/terms/bin/FACE01_DEV/example/example_logging.py] [example_logging.py] [DEBUG] 99.4%
[2024-08-27 21:18:34,678] [/home/terms/bin/FACE01_DEV/example/example_logging.py] [example_logging.py] [DEBUG] (148, 342, 272, 217)
[2024-08-27 21:18:34,678] [/home/terms/bin/FACE01_DEV/example/example_logging.py] [example_logging.py] [DEBUG] -----------------
ログとして出力させたい場合に使うと良いですね⭐️''
ログとして出力すると、どのPythonファイルがどのログレベルで出力したのか一目瞭然です!💗
example.face_coordinates module
- Summary:
このエグザンプルコードでは、顔座標の取得と顔画像として保存する方法を学びます。
サンプル
python3 example/face_coordinates.py
- Config.ini setting:
config.iniを以下のように記述して、顔座標と顔画像の保存を設定します。
[FACE-COORDINATE]
headless = True
crop_face_image = True
frequency_crop_image = 5
crop_with_multithreading = False
number_of_crops = 0
- Result:
以下のような出力が得られます。
face coordinates: [(156, 233, 304, 85), (114, 593, 276, 431), (130, 704, 349, 485), (319, 334, 449, 204), (281, 645, 405, 521), (23, 810, 313, 520), (349, 394, 573, 170), (244, 302, 408, 138), (344, 692, 514, 522), (21, 256, 215, 62)]
}
顔画像の保存はデータセットを作成する時、役立ちます⭐️''
- Source code:
example.faiss_combination_similarity module
指定されたディレクトリ内のすべてのnpKnown.npzファイルを読み込み、faissを使用して指定された組み合わせのコサイン類似度を検出するコードの例.
- Summary:
クラス数が膨大になると同じ人物が別クラスに紛れることがあります。これを目視で確認するのは不可能です。また組み合わせ総数が膨大になるためすべての計算を順列に行えば現実的な時間で処理できなくなります。 このスクリプトではfaissを用いて組み合わせ爆発を防ぎ、非常に短い時間で、すべてのクラスに対して類似度を計算し、任意の類似度以上の組み合わせを出力します。 この例では、指定されたディレクトリ内のすべてのnpKnown.npzファイルを読み込み、faissを使用して指定された組み合わせのコサイン類似度を検出する方法を学ぶことができます。
- Results:
プロジェクトルートディレクトリにoutput.csvが作成されます。
サンプル
python3 example/faiss_combination_similarity.py
この例では扱う顔画像ファイル数が非常に少ないためfaissには向いていないです💦
学習モデルの大規模データセットに用いると良いでしょう⭐️'' (その場合はnlistの値を変えてくださいね💗)
- Source code:
example.faiss_gpu_test module
GPU上でFAISSを用いたベクトルインデックスの作成と動作確認.
- Summary:
このスクリプトは、FAISSライブラリを使用して512次元のランダムベクトルデータをGPU上でインデックス化し、 ベクトルが正しくインデックスに追加されるかを確認します。FAISSの`GpuIndexFlatL2`インデックスを用いて L2距離に基づいた検索を行い、インデックスがGPU上で正常に機能しているかをテストします。
FAISSには、インストール時に`faiss-gpu`と`faiss-cpu`の2種類があり、このうち`faiss-gpu`をインストールした際に GPU上での動作が正常に行われないことがあります。このコードを実行し、`faiss-gpu`が期待通りに動作しない場合には、 `faiss-gpu`をアンインストールし、代わりに`faiss-cpu`をインストールすることが推奨されます。 これにより、CPU上でのFAISSの動作を確認できます。
実行には`faiss`および`numpy`ライブラリが必要です。
- Output Verification:
このスクリプトの実行時に "Index contains 10000 vectors." という出力が表示される場合、 以下の処理が正常に動作していることが確認できます:
GPUリソースの確保: faiss.StandardGpuResources() がエラーなく実行されています。
GPUインデックスの作成: faiss.GpuIndexFlatL2(res, d) により、GPUインデックスが正常に構築されています。
ベクトルの追加: index.add(xb) によって、ベクトルがインデックスに正常に追加されています。
インデックス内容の確認: index.ntotal により、インデックスに追加されたベクトル数が正しく表示されています。
この結果により、`faiss-gpu`はGPU上でのインデックス作成やデータ処理が期待通り動作していると判断できます。
サンプル
python3 example/faiss_gpu_test.py
メモ
このテストをパスしてもなお`faiss-gpu`が機能しない場合があります。その場合はfaiss-cpuを試してください。⭐️''
- Source code:
example.get_encoded_data module
- Summary:
このエグザンプルコードでは、顔の特徴量(エンコーディングされたデータ)を取得する方法を学びます。
サンプル
python3 example/get_encoded_data.py
注釈
このコードでは、かならず一人が映っている映像を使用してください。
Results:
face encoded data: [-0.01199415  0.01052003  0.07660526  0.06551921 -0.07496994 -0.12972911
-0.05913385 -0.14237705  0.05547058 -0.13777749  0.13601969 -0.12244888
-0.15050077  0.00519788 -0.03569282  0.17992854 -0.08323735 -0.08283503
-0.10274227 -0.07727417  0.08088023  0.01752477 -0.05877539  0.02624322
-0.0077478  -0.25635812 -0.13101193 -0.09281664  0.05218935 -0.04231806
-0.06299889  0.04474396 -0.19532356 -0.12053486  0.02230695  0.06118448
-0.06408831 -0.05561456  0.19666338 -0.00320839 -0.16399916  0.10793754
0.09513831  0.19015315  0.1805291   0.06770462  0.04203921 -0.13319662
0.14975622 -0.17903461 -0.0205469   0.12766521  0.23538746  0.1532644
0.03183981 -0.04921352  0.12409633  0.0604726  -0.21282698  0.0895256
0.1691601  -0.07778979  0.01881283  0.05160358  0.2315844   0.05034623
-0.04736616 -0.10536997  0.15513012 -0.20276567 -0.11107794  0.02522913
-0.07532144 -0.1432429  -0.28969032  0.03757014  0.41931418  0.1212881
-0.1964694   0.06237716 -0.05123742 -0.04189032  0.14579299  0.06779657
-0.04064779 -0.05232659 -0.07283606  0.02151246  0.25605643 -0.08359357
0.03513885  0.15748617  0.05288177  0.03470919  0.0150839   0.04732724
dlibでは128次元、JAPANESE FACE V1では512次元のNDArrayデータが取得されます⭐️''
- Source code:
example.get_encoded_data_JAPANESE_FACE_V1 module
JAPANESE_FACE_V1学習モデルを使用して顔特徴ベクトルを取得する例.
- Summary:
この例では、「JAPANESE_FACE_V1.onnx」モデルを使用して、シンプルに特徴ベクトルを取得する方法を学ぶことができます。 このスクリプトは顔画像ファイルを読み込み、その顔画像の特徴ベクトルを標準出力に出力します。 特徴ベクトルは「JAPANESE_FACE_V1.onnx」モデルから生成される512次元のベクトルです。
サンプル
python3 example/get_encoded_data_JAPANESE_FACE_V1.py
- Source code:
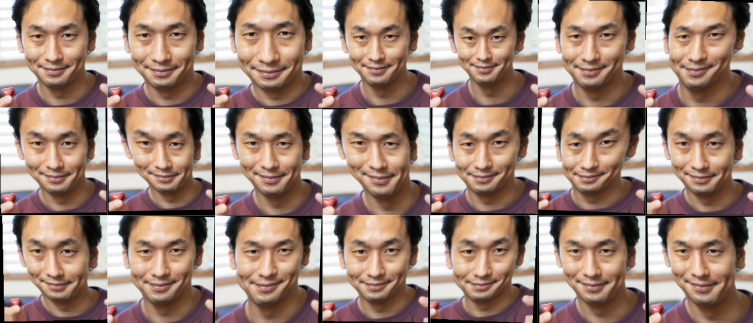
example.jitter module
Example of to jitter images.
- Summary:
In this example, you can learn how to get jittered images.
- param path:
Directory path where images containing faces exist. num_jitters (int, optional): Number of jitters. Defaults to 5. size (int, optional): Resize the image to the specified size. Defaults to 200. disturb_color (bool, optional): Disturb the color. Defaults to True.
- type path:
str
- returns:
None
サンプル
python3 example/jitter.py path 100 200 True
- Result:
- Source code:
- logger = <Logger /home/terms/bin/FACE01_DEV/example/jitter.py (INFO)>
Initialize and Setup logger. When coding a program that uses FACE01, code initialize and logger first. This will read the configuration file config.ini and log errors etc.
example.lightweight_GUI module
シンプルで軽量なGUIアプリケーションの作成例.
- Summary:
この例では、シンプルで軽量なGUIアプリケーションの作成方法を学びます。
サンプル
python3 example/lightweight_GUI.py
- Results:
スクリーンショットは作成されるウィンドウを示しています。
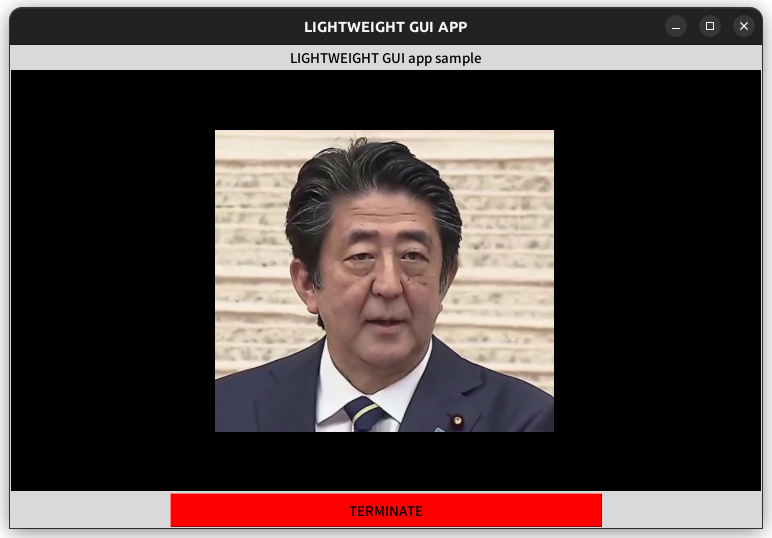
コンソール出力は以下のようになります。
[2023-01-23 22:33:18,752] [face01lib.load_preset_image] [load_preset_image.py] [INFO] Loading npKnown.npz
安倍晋三
        similarity              99.7%
        coordinate              (134, 431, 248, 317)
        time                    2023,01,23,22,33,23,445574
        output                  output/安倍晋三_2023,01,23,22,33,23,446640_0.19.png
-------
- Source code:
example.make_ID_card module
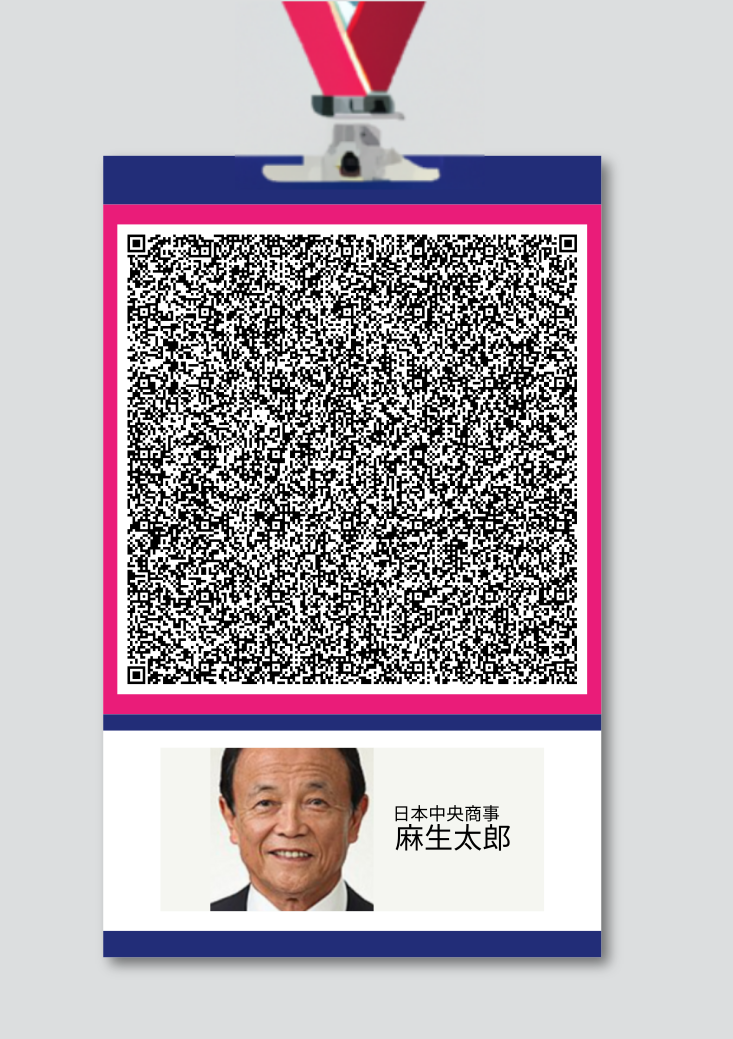
JAPANESE FACE V1モデルを使用したQR顔エンコードの例.
- Summary:
この例では、マルチモーダル認証のためのQRコード付きIDカードサンプルの作成方法を学ぶことができます。 作成された画像ファイルは'example/img/'ディレクトリに保存されます。 この例ではより洗練されたQRコード付きIDカードサンプルを作成していますが、QRコードだけの作成ならば Spoof().make_qr_code() で作成できます。'example/anti_spoof.py'を参照してください。
サンプル
python3 example/make_ID_card.py
- Results:
- Source code:
example.make_find_and_move_same_faces module
同一の512次元データを持つファイルをsame_faceフォルダに移動するコードの例.
- Summary:
このスクリプトは、指定したディレクトリとそのサブディレクトリ内にある`npKnown.npz`ファイルを読み込み、 512次元の顔認識ベクトルのコサイン類似度に基づいて同一の顔画像を検出し、 同一と判断された画像ファイルを各サブディレクトリごとの`same_face`フォルダに移動します。 `same_face`フォルダは各サブディレクトリに存在しない場合は自動で作成されます。
各`npKnown.npz`ファイルには、人物名とその512次元の特徴量データが含まれており、このデータを基に 類似性を評価します。類似度が閾値以上のものは同一とみなし、重複する顔画像を`same_face`フォルダに集約します。
サンプル
python3 example/make_find_and_move_same_faces.py /path/to/root_dir --threshold 0.95
- Source code:
example.make_npKnown_file module
プリセット画像をロードし、npKnown.npzファイルの存在を確認するコードの例.
- Summary:
このコードは、ディレクトリ選択ダイアログを表示し、選択したディレクトリに`npKnown.npz`ファイルが存在するか確認します。 ファイルが存在しない場合は、プリセット画像を使用して`npKnown.npz`ファイルを作成します。
サンプル
python3 example/make_npKnown_file.py
コードを実行するとnpKnown.npzファイルが作成されます⭐️''
- Source code:
example.make_npKnown_for_subdirs module
npKnown.npzファイルを指定したディレクトリとそのサブディレクトリごとに作成するスクリプト.
- Summary:
このスクリプトは、ユーザーが指定したディレクトリとそのサブディレクトリ内にある顔画像ファイルに対して 512次元特徴量データを用いたnpKnown.npzファイルを生成します。 選択されたディレクトリ以下の各サブディレクトリについて、npKnown.npzファイルが既に存在する場合はスキップし、 存在しない場合にのみ新たに作成します。
- Requirements:
ttkbootstrap
face01lib.load_preset_image
サンプル
ターミナルで以下のコマンドを実行してスクリプトを起動します。
`bash
python3 example/make_npKnown_for_subdirs.py
`
サンプル
実行後、ディレクトリ選択ダイアログが表示され、処理対象のディレクトリを選択できます。 選択したディレクトリ内のサブディレクトリごとにnpKnown.npzファイルが作成されます。
ディレクトリを再帰的に捜査してnpKnown.npzを作成します⭐️''
- Source code:
- create_npz_for_all_subdirs(root_dir, load_preset_image_obj)[ソース]
指定したディレクトリ以下の1階層目のサブディレクトリに対して、 npKnown.npzファイルを作成します。
- パラメータ:
root_dir (str) -- ルートディレクトリのパス。
load_preset_image_obj (LoadPresetImage) -- 画像読み込み用のオブジェクト。
example.make_npKnown_for_subdirs_noGUI module
このスクリプトは、指定したディレクトリ配下のサブディレクトリにnpKnown.npzファイルを作成します。
- 変更点:
GUIによるディレクトリ選択を廃止し、コード中で指定します。
指定ディレクトリ: /media/terms/2TB_Movie/face_data_backup/data
ファイル名例: make_npKnown_for_subdirs_noGUI.py
- 実行方法:
python3 make_npKnown_for_subdirs_noGUI.py
- create_npz_for_all_subdirs(root_dir, load_preset_image_obj)[ソース]
指定したディレクトリ以下の1階層目のサブディレクトリに対して、 npKnown.npzファイルを作成します。
- パラメータ:
root_dir (str) -- ルートディレクトリのパス。
load_preset_image_obj (LoadPresetImage) -- 画像読み込み用のオブジェクト。
example.make_npKnown_parallel module
npKnown.npzファイルを並列処理で作成するスクリプト.
- Summary:
このスクリプトは、指定されたディレクトリ以下のサブディレクトリを並列処理し、 各サブディレクトリ内にnpKnown.npzファイルを効率的に作成します。 並列処理を利用することで、従来の逐次処理よりも高速にファイルを生成できます。
- Features:
並列処理を使用して実行速度を向上。
サブディレクトリごとにnpKnown.npzファイルを作成。
既存のnpKnown.npzファイルをスキップする仕組み。
- Requirements:
ttkbootstrap
concurrent.futures
face01lib.load_preset_image
サンプル
ターミナルで以下のコマンドを実行してスクリプトを起動します。
`bash
python3 example/make_npKnown_parallel.py
`
サンプル
実行後、ディレクトリ選択ダイアログが表示されます。 選択したディレクトリ内のすべてのサブディレクトリに対して、 並列処理を利用してnpKnown.npzファイルが生成されます。
- Source code:
example.similarity module
Example of calculating similarity from two photos with JAPANESE_FACE_V1.onnx model.
- Summary:
This is a sample code that calculates the similarity between two given photos, using the JAPANESE_FACE_V1.onnx model, which is a Japanese-only learning model.
サンプル
python3 example/similarity.py
- Source code:
Copyright Owner: Yoshitsugu Kesamaru Please refer to the separate license file for the license of the code.
example.simple module
シンプルな顔認識のコード例.
- Summary:
このコード例では、FACE01がどれほど簡単に実行できるのかを学びます。
サンプル
python3 example/simple.py
- Source code:
- logger = <Logger /home/terms/bin/FACE01_DEV/example/simple.py (INFO)>
初期化とロガーの設定.
FACE01を使ったコードでは、まず`initialize`と`logger`をコードしなくてはいけません。 これらは`config.ini`設定ファイルを読み込んだり`log`の設定を行います。
example.simple_JAPANESE_FACE_V1 module
Example of simple face recognition script with EfficientNetV2 Arcface model.
- Summary:
In this example, you can learn how to execute FACE01 as simple.
サンプル
python3 example/simple_efficientnetv2_arcface.py
- Source code:
example.simple_file_browser module
Example: 簡易ファイルラウザ実装例
- Summary:
ttkbootstrapを用いた簡易ファイルブラウザ実装例
サンプル
python3 example/simple_file_browser.py
参考
ttkbootstrap https://ttkbootstrap.readthedocs.io/en/version-0.5/themes.html
example.verify module
verify.py.
- Summary:
このスクリプトは、2枚の画像を読み込み、JAPANESE_FACE_V1モデルを用いて 同一人物かどうかを判定するためのコマンドラインツールです。
サンプル
$ python verify.py <image1> <image2> [--threshold THRESHOLD]
- Options:
- -h, --help
このヘルプメッセージを表示し、プログラムを終了します。
- --threshold THRESHOLD
0以上1以下の範囲のfloat値。同一人物と判断するためのコサイン類似度のしきい値を指定します。 指定しない場合のデフォルトは 0.25 です。 例: --threshold 0.4
- License:
This script is licensed under the terms provided by yKesamaru, the original author.
- check_image_path(path: str) str[ソース]
画像ファイルのパスがpng,jpg,jpegのいずれかであるかをチェックし、 不適切な場合はエラーを投げる。
- パラメータ:
path (str) -- 画像ファイルのパス
- 例外:
argparse.ArgumentTypeError -- 拡張子がpng,jpg,jpeg以外の場合に発生
- 戻り値:
検証済みの画像パス
- 戻り値の型: